Connecting integrations
Connection methods
- OAuth
- API key
You click Connect, log in to the third-party service, and Relevance securely stores your tokens. No manual key management needed.
- Click Connect on the integration
- A modal opens and redirects you to the third-party login (e.g. Google, HubSpot)
- Authorize the requested scopes
- The integration shows as connected and is immediately available
Depending on how your organization has configured each external application, you may need to request admin access to enable OAuth or to obtain an API key. Check with your IT team or the admin of the external application.
Managing connections
All active integrations are visible in the Super GTM settings panel. Each integration has one of three states:Connected and enabled
Integration is active and the agent can use it
Connected but disabled
Credentials exist but you’ve toggled it off in your settings
Not connected
No credentials stored — a “Connect” button is shown
Write approval
Every integration action is classified as either a read or a write (create, update, delete). You control how the agent handles writes.- Ask before writing (default)
- Never ask
- Per-integration overrides
The agent pauses and asks for your approval before writing to any integration — e.g. “I’m about to create a contact in HubSpot — approve?”
Certain built-in agents (like Explorer) are hardcoded to read-only — they can query and search integrations but cannot write anything, regardless of your approval settings.
Setup details
HubSpot
HubSpot
Connection method: OAuthGives Super GTM read and write access to your HubSpot CRM — search contacts, companies, and deals; create and update records; manage sequences and pipelines; pull activity history.HubSpot requests a broad set of optional scopes (contacts, companies, deals, files, tickets, automation sequences, sales email, pipeline management). This is intentional to enable the full range of Super GTM workflows. You can review and approve scopes during the OAuth flow.How to connect:
- In the Super GTM settings panel, find HubSpot under Integrations
- Click Connect account
- Sign in to HubSpot and authorize access when prompted
- Select the HubSpot portal to connect if you have multiple
- Each user must authorize their own HubSpot connection
- If your HubSpot portal restricts app installations, a HubSpot admin needs to enable App Marketplace access for your user — see Troubleshooting below
- The agent respects your HubSpot user permissions — it can only access records you have permission to see
Salesforce
Salesforce
Connection method: OAuthAdditional field: Sandbox account checkbox — enable this if you’re connecting a Salesforce sandbox (test/staging) environment. Routes login to test.salesforce.com instead of login.salesforce.com.Connects Super GTM to your Salesforce org — full API access with read and write CRM data, SOQL queries, and actions across Salesforce objects.How to connect:
- In the Super GTM settings panel, find Salesforce under Integrations
- If you’re connecting a sandbox (test/staging) environment, check Sandbox account before proceeding — this routes login to test.salesforce.com instead of login.salesforce.com
- Click Connect account
- Sign in to Salesforce and authorize the connection
- If your org requires admin approval for connected apps, request access from your Salesforce admin
- Salesforce organizations often require admin approval for new OAuth apps — see Troubleshooting below if the connection fails
- The agent operates within your Salesforce user permissions and sharing rules
- Custom objects and fields are accessible if they’re visible to your user profile
Apollo
Apollo
Connection method: API keyGives Super GTM access to Apollo’s sales intelligence database — search and enrich contact and company data, find contact information, pull prospect details.How to connect:
- Log in to Apollo and navigate to Settings > Integrations > API
- Generate an API key
- In the Super GTM settings panel, find Apollo under Integrations
- Click Add API key and paste your Apollo API key
- Apollo API keys are scoped to your Apollo account — each user needs their own key, or an admin can add a shared project-level key
- API usage counts against your Apollo plan’s API limits
Gong
Gong
Connection method: API keyConnects Super GTM to Gong call recordings and transcripts — pull call data, surface key moments, incorporate conversation intelligence into deal briefings.How to connect:
- In Gong, navigate to Settings > Ecosystem > API
- Generate an API key (requires Gong admin access)
- In the Super GTM settings panel, find Gong under Integrations
- Click Add API key and enter your Gong API credentials
- Gong API access typically requires Technical Admin permissions in Gong — check with your Gong admin
- The agent can only access calls that are already processed and indexed in Gong
Salesloft
Salesloft
Connection method: API keyConnects Super GTM to your Salesloft account for sales engagement workflows.How to connect:
- Log in to Salesloft and navigate to your API settings
- Generate an API key
- In the Super GTM settings panel, find Salesloft under Integrations
- Click Add API key and paste your Salesloft API key
Slack
Slack
Connection method: OAuthConnects Super GTM to your Slack workspace — read and post messages, search conversations, list users, manage channels, add reactions.How to connect:
- In the Super GTM settings panel, find Slack under Integrations
- Click Connect account
- Select your Slack workspace and authorize the requested permissions
- If your workspace restricts app installations, request approval from your Slack admin
- Slack workspace admins can restrict which apps users can install — if the authorization fails, you may need admin approval
- The agent can only read messages in channels it has been added to, and public channels
- Posting to channels requires the agent to have access to those channels
Gmail
Gmail
Connection method: OAuth (via GSuite)Connects Super GTM to your Gmail account — compose, read, send, and draft emails, manage labels, modify settings.How to connect:
- In the Super GTM settings panel, find GSuite under Integrations
- Click Connect account and sign in with your Google account
- Grant the requested Gmail permissions
- If your Google Workspace organization restricts third-party app access, contact your Google Workspace admin
- Gmail access is part of the GSuite integration, which also covers Google Calendar, Google Docs, Google Drive, and Google Sheets
- Google Workspace organizations often have policies restricting which apps can access Gmail — your admin may need to approve the connection
- Sent emails appear in your Gmail Sent folder as normal
Microsoft Outlook
Microsoft Outlook
Connection method: OAuthConnects Super GTM to your Microsoft Outlook account — read, send, and draft emails, manage labels and mailbox settings.How to connect:
- In the Super GTM settings panel, find Microsoft Outlook under Integrations
- Click Connect account
- Sign in with your Microsoft account and grant the requested permissions
- If your Microsoft 365 tenant restricts app consent, your IT admin may need to grant admin consent
- Microsoft 365 organizations often require admin consent for third-party OAuth apps — contact your IT admin if the authorization fails
- The connection covers your personal Outlook mailbox; shared mailboxes may require additional configuration
Microsoft Teams
Microsoft Teams
Connection method: OAuthGives Super GTM access to your Microsoft Teams environment — read and send chat and channel messages, read meeting transcripts, manage online meetings.How to connect:
- In the Super GTM settings panel, find Microsoft Teams under Integrations
- Click Connect account
- Sign in with your Microsoft account and authorize the connection
- Admin consent is typically required for Teams app integrations — work with your IT admin
- Teams API access almost always requires Microsoft 365 admin consent — plan for this when setting up
- Meeting transcript access requires that transcription is enabled in your Teams tenant
Google Calendar
Google Calendar
Connection method: OAuth (via GSuite)Connects Super GTM to your Google Calendar — check availability, create events, get scheduling context.How to connect:
Google Calendar access is included with the GSuite integration. Connect via the GSuite option in the Integrations section.Things to know:
- Calendar access is part of the GSuite integration alongside Gmail, Google Docs, Google Drive, and Google Sheets
- The agent can only create events on calendars you have write access to
- Meeting invitations sent by the agent will come from your Google account
Microsoft Calendar
Microsoft Calendar
Connection method: OAuthConnects Super GTM to Microsoft Calendar (via Microsoft 365) — create and manage calendar events, including shared calendars.How to connect:
- In the Super GTM settings panel, find Microsoft Calendar under Integrations
- Click Connect account
- Sign in with your Microsoft account and authorize the connection
- Microsoft Calendar access is separate from Microsoft Outlook — you can connect either or both
- Shared calendar access depends on your Microsoft 365 permissions
Google Docs
Google Docs
Connection method: OAuth (via GSuite)Connects Super GTM to Google Docs — read and edit documents, pull content from existing docs, create new documents.How to connect:
Google Docs access is included with the GSuite integration. Connect via the GSuite option in the Integrations section.Things to know:
- Google Docs access is part of the GSuite integration alongside Gmail, Google Calendar, Google Drive, and Google Sheets
- The agent can only access documents shared with or owned by your Google account
Google Drive
Google Drive
Connection method: OAuth (via GSuite)Connects Super GTM to Google Drive — read and write files, search across your Drive.How to connect:
Google Drive access is included with the GSuite integration. Connect via the GSuite option in the Integrations section.Things to know:
- Google Drive access is part of the GSuite integration
- The agent can only access files shared with or owned by your Google account
Google Sheets
Google Sheets
Connection method: OAuth (via GSuite)Connects Super GTM to Google Sheets — read and write spreadsheet data.How to connect:
Google Sheets access is included with the GSuite integration. Connect via the GSuite option in the Integrations section.Things to know:
- Google Sheets access is part of the GSuite integration
- The agent can only access spreadsheets shared with or owned by your Google account
Notion
Notion
Connection method: OAuthConnects Super GTM to your Notion workspace — read and create pages, query and create databases, create comments, manage blocks, search.How to connect:
- In the Super GTM settings panel, find Notion under Integrations
- Click Connect account
- Sign in to Notion and select which pages and databases to share with the integration
- Notion requires you to explicitly grant access to each page or database — the agent can only see what you’ve shared
- Notion’s permission model is selective: you must share specific pages or databases during the OAuth flow. The agent cannot see anything you haven’t explicitly shared.
- If you want the agent to access new Notion pages in the future, you’ll need to update the connection to include them
Linear
Linear
Connection method: OAuth or API keyLinear is the only integration that supports both OAuth and API key. You can choose whichever you prefer — both methods work interchangeably. If either is configured, the integration shows as connected.Connects Super GTM to Linear — read, create, update, and archive issues, manage comments, read projects and labels.How to connect:OAuth (per user):
- In the Super GTM settings panel, find Linear under Integrations
- Click Connect account and authorize via your Linear account
- In Linear, navigate to Settings > Security & access > Personal API keys
- Create a new API key
- In the Super GTM settings panel, find Linear under Integrations
- Click Add API key and paste your Linear API key
Ashby
Ashby
Connection method: API keyConnects Super GTM to Ashby for recruiting and ATS workflows.How to connect:
- Log in to Ashby and navigate to your API settings
- Generate an API key
- In the Super GTM settings panel, find Ashby under Integrations
- Click Add API key and paste your Ashby API key
Avoma
Avoma
Connection method: API keyConnects Super GTM to Avoma for meeting intelligence — access call recordings, transcripts, and meeting notes.How to connect:
- Log in to Avoma and navigate to your API settings
- Generate an API key
- In the Super GTM settings panel, find Avoma under Integrations
- Click Add API key and paste your Avoma API key
Firmable
Firmable
Connection method: API keyConnects Super GTM to Firmable for company data enrichment.How to connect:
- Log in to Firmable and navigate to your API settings
- Generate an API key
- In the Super GTM settings panel, find Firmable under Integrations
- Click Add API key and paste your Firmable API key
ZoomInfo
ZoomInfo
Connection method: API keyConnects Super GTM to ZoomInfo for contact and company intelligence. ZoomInfo is the only integration that requires three separate fields instead of a single API key.Required fields:
- ZoomInfo Email — your ZoomInfo account email address
- ZoomInfo Client ID — your ZoomInfo API client ID
- ZoomInfo Private Key — your ZoomInfo private key (this is a multi-line key, pasted into a larger text area)
- Log in to ZoomInfo and navigate to your account settings
- Locate your Email, Client ID, and Private Key
- In the Super GTM settings panel, find ZoomInfo under Integrations
- Enter all three values
Cursor
Cursor
Connection method: API keyConnects Super GTM to Cursor — list, launch, and stop agents, view conversation history, send follow-up prompts.How to connect:
- In Cursor, navigate to your account settings and find the API section
- Generate an API key
- In the Super GTM settings panel, find Cursor under Integrations
- Click Add API key and paste your Cursor API key
Troubleshooting
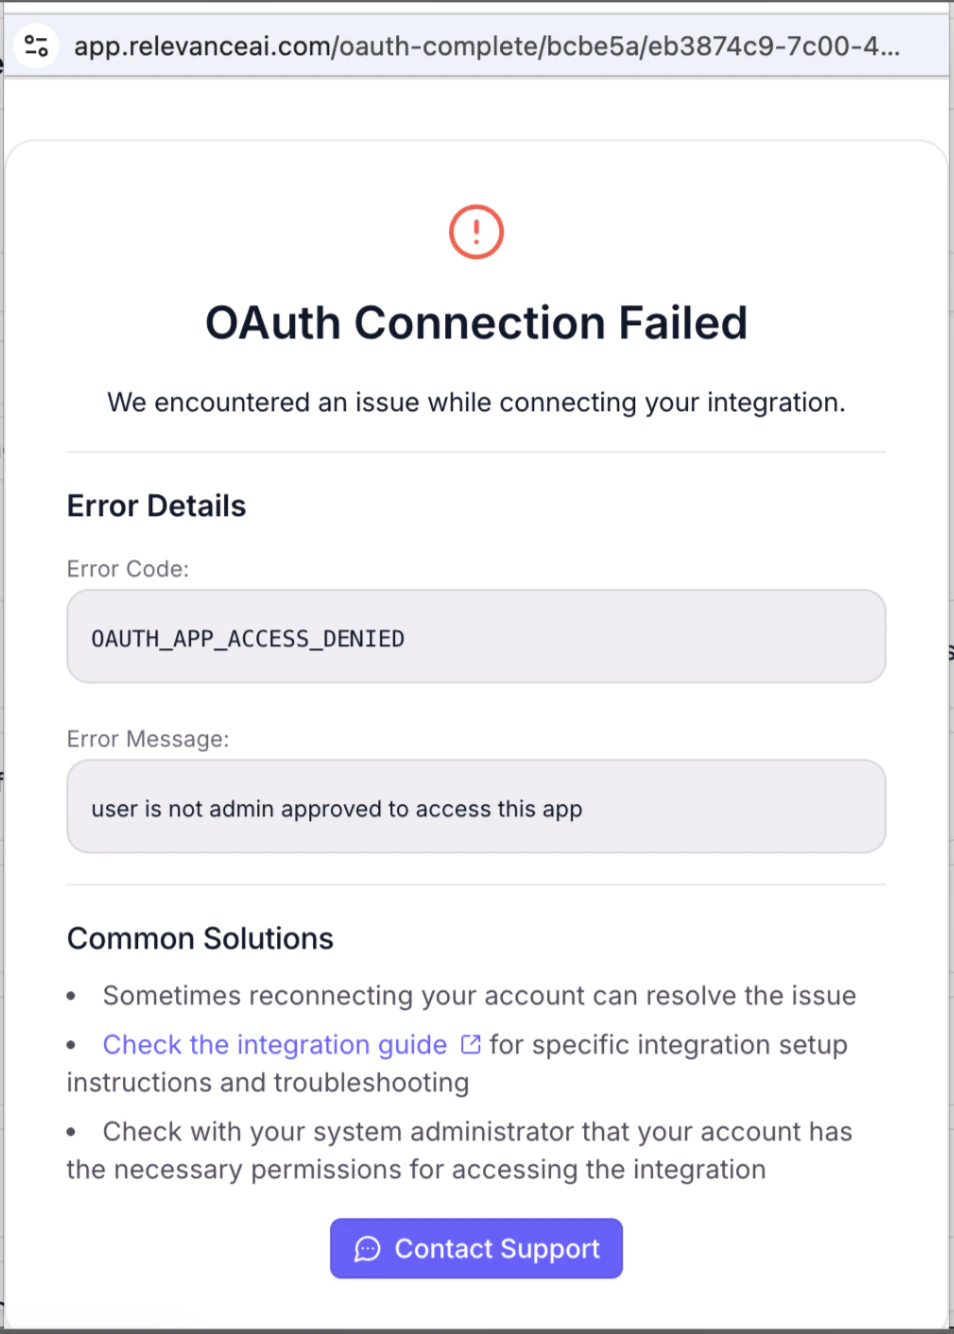
Salesforce OAuth error when connecting
Salesforce OAuth error when connecting
When connecting Salesforce to Relevance AI, you may encounter one of these OAuth errors: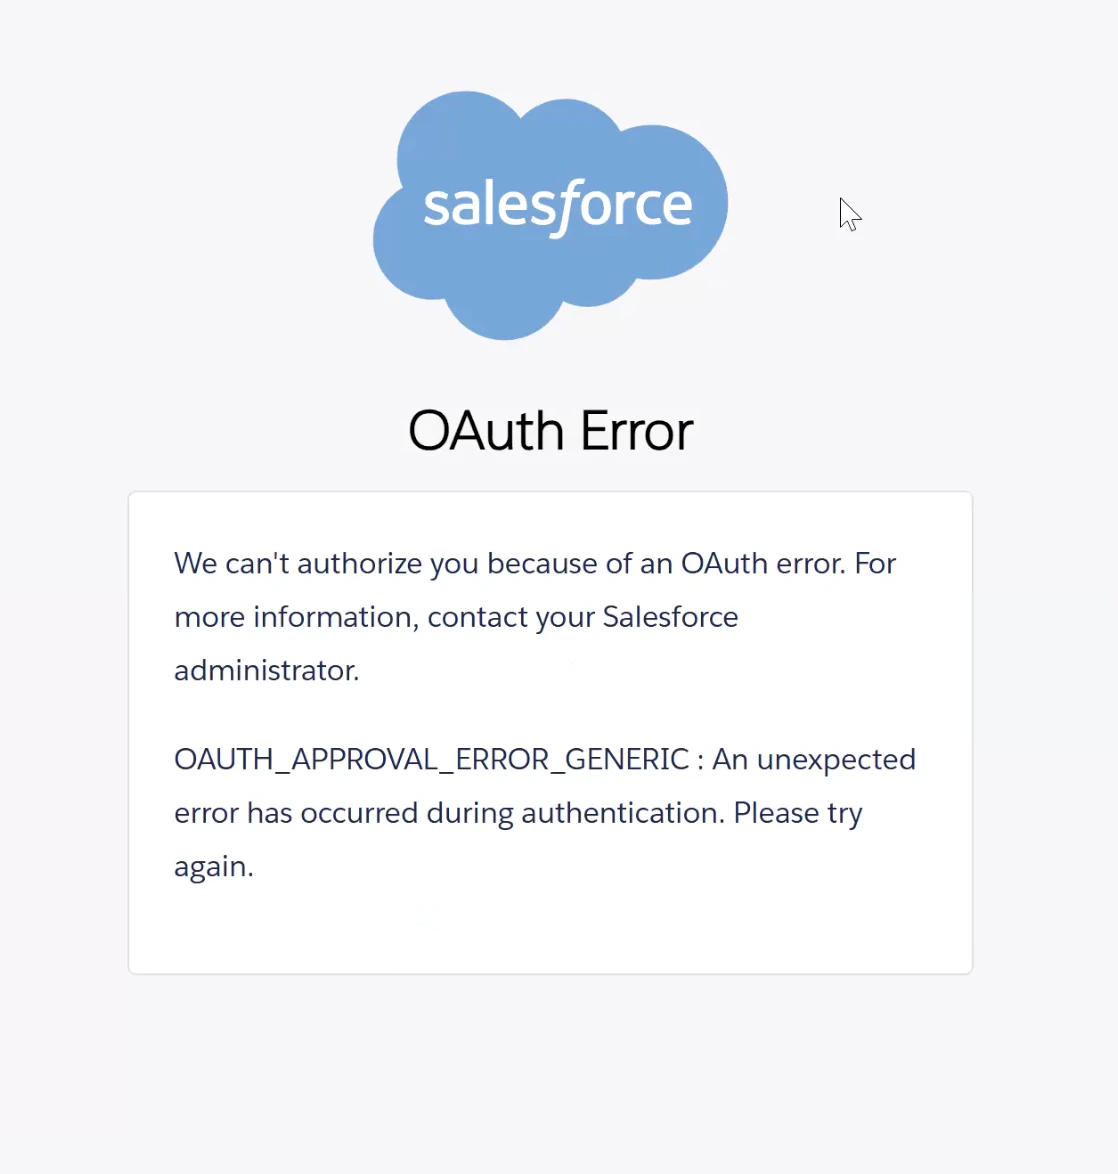
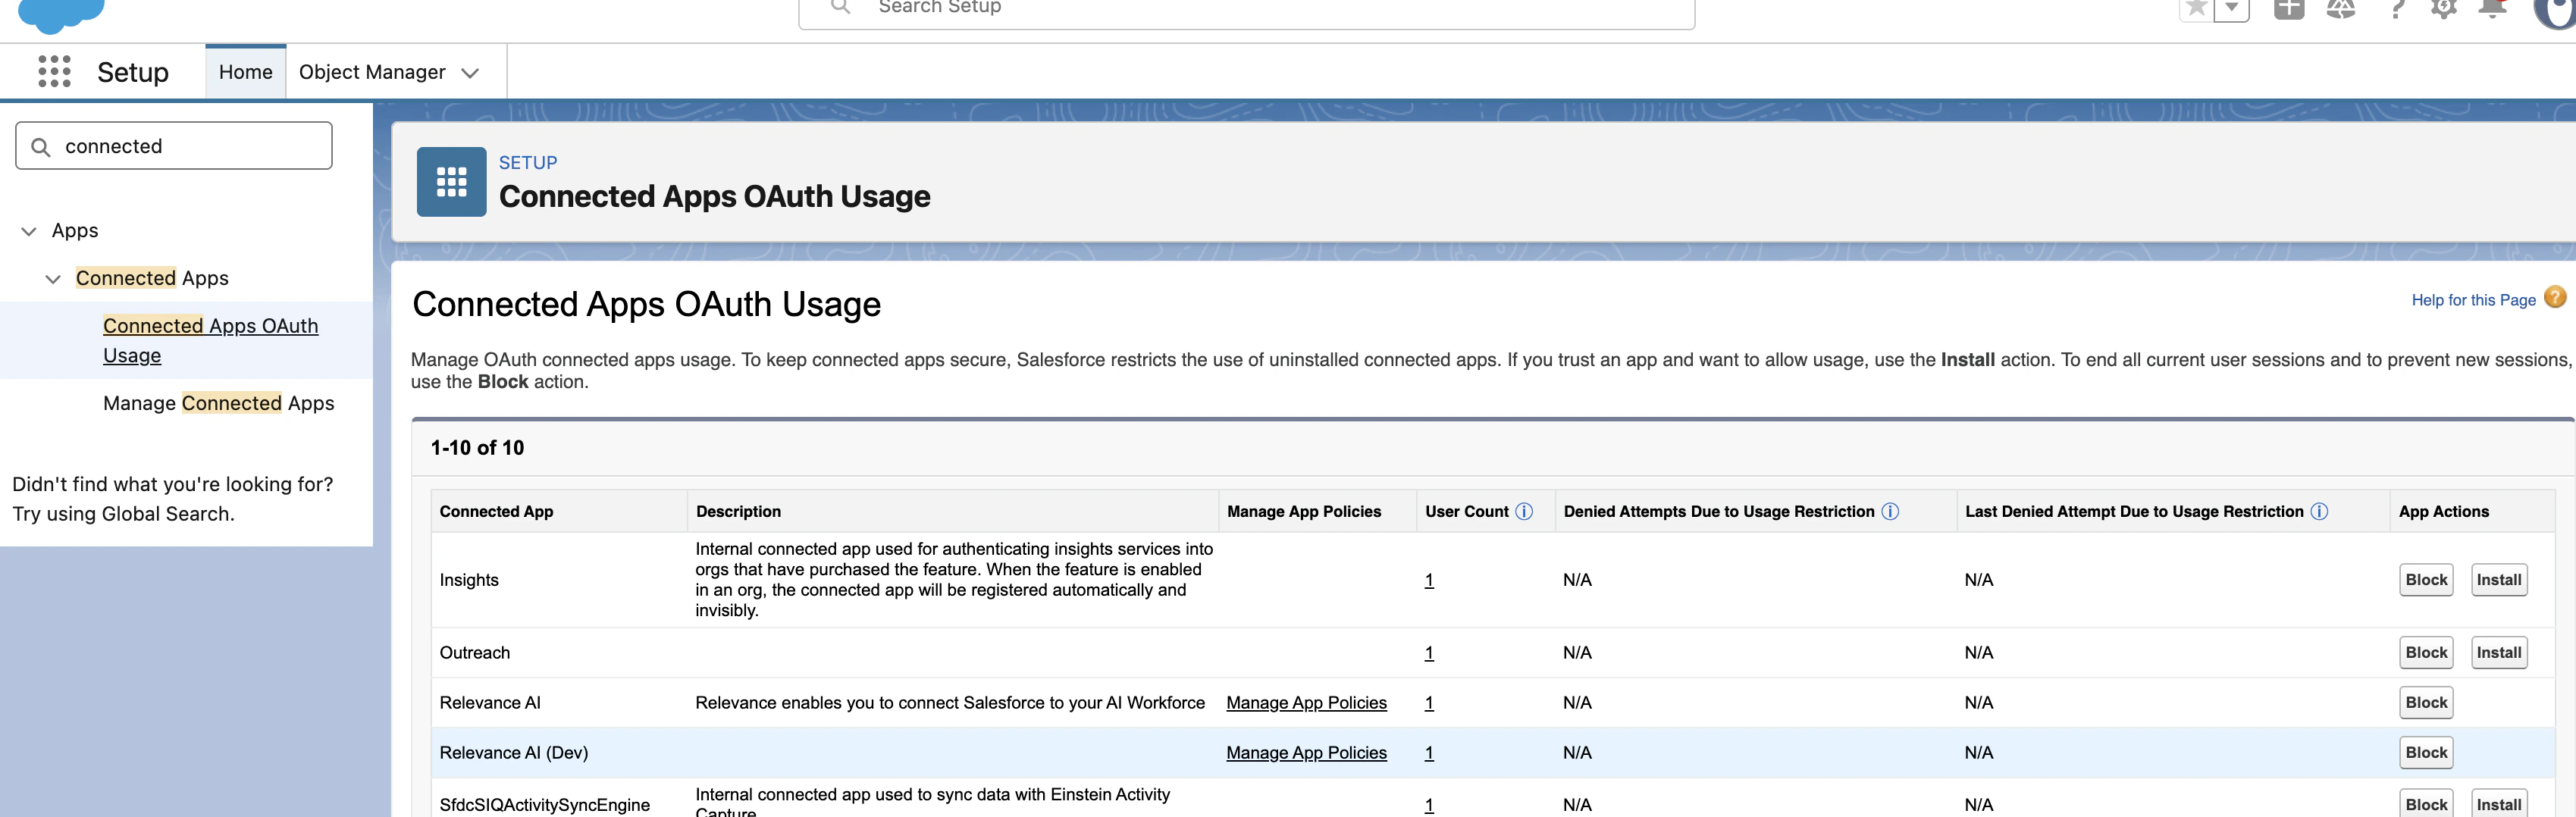
Install the Relevance AI app if needed
If the Relevance AI app is not already installed, click Install. This redirects to the app settings page — skip to step 5.
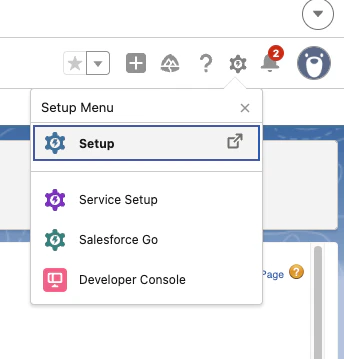
Go to Manage Connected Apps
Navigate to Manage Connected Apps and click Relevance AI.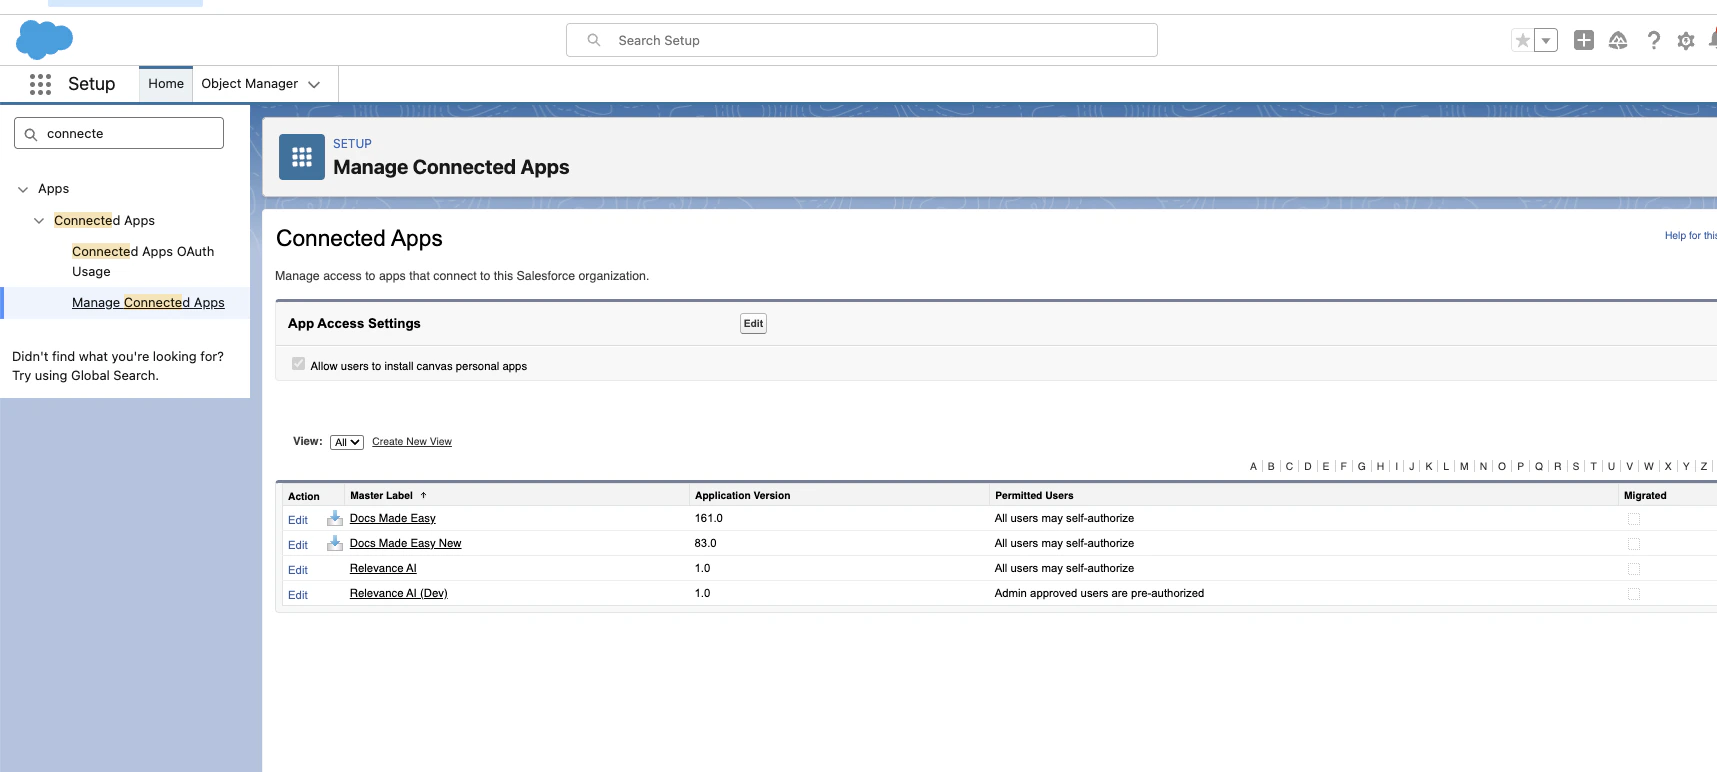
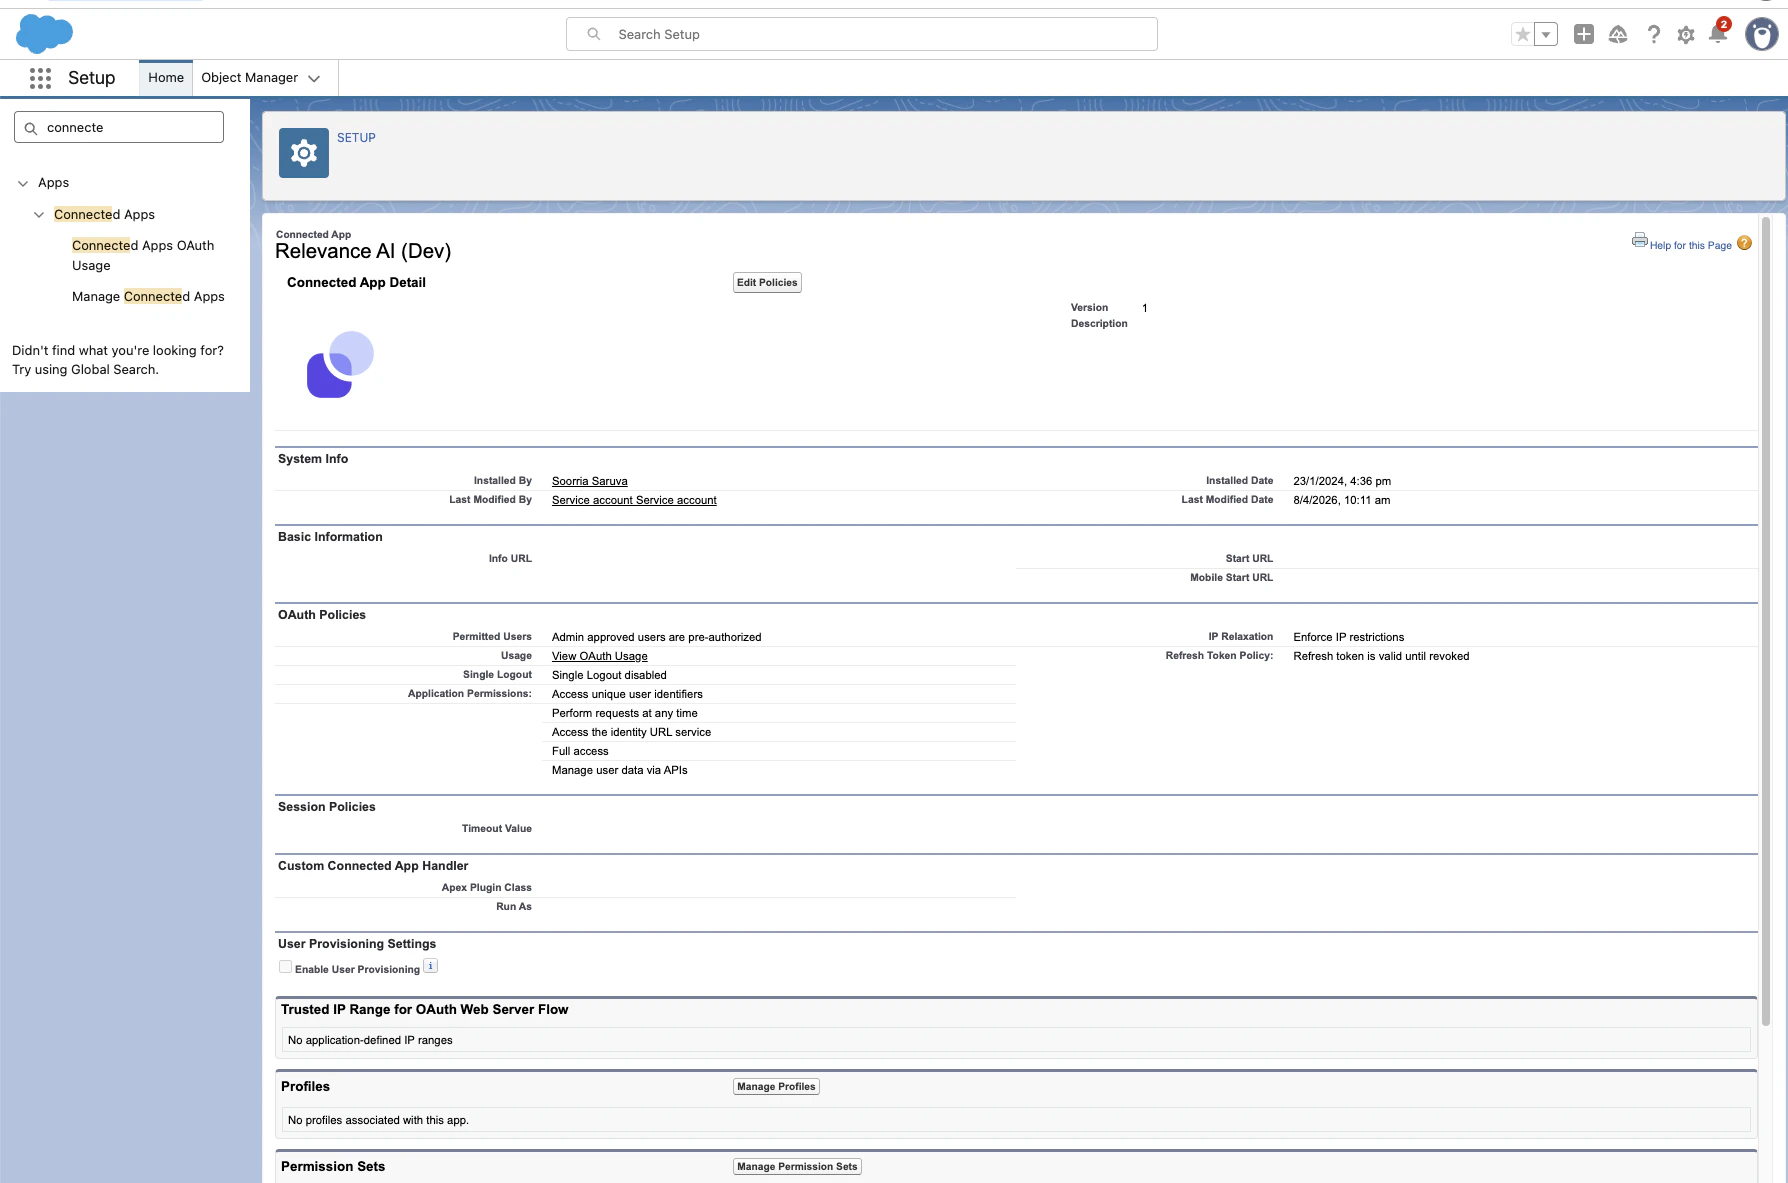
Configure permitted users
Under OAuth Policies, set the Permitted Users dropdown to one of:All users may self-authorize — any Salesforce user can connect to Relevance AI.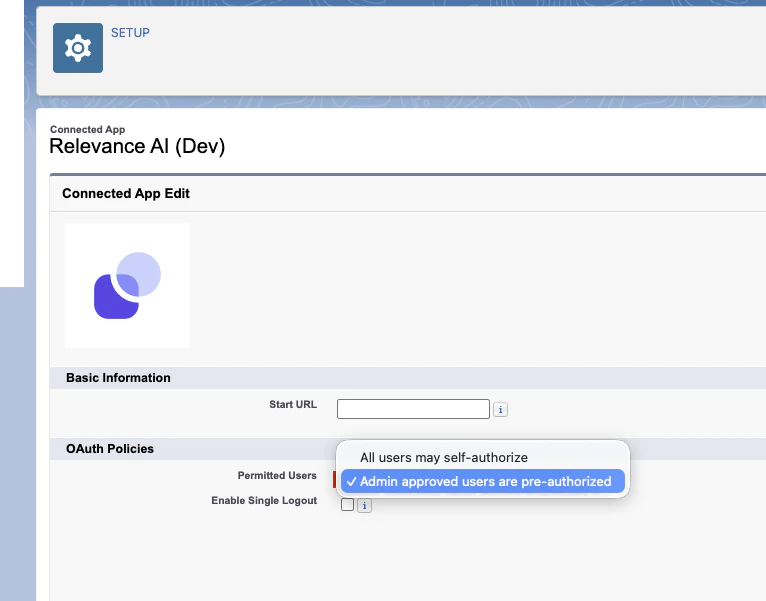

If you don’t see the Relevance AI app in Connected Apps OAuth Usage, initiate the connection from the Super GTM settings panel first — this registers the app in your Salesforce org.
HubSpot app installation blocked by permissions
HubSpot app installation blocked by permissions
If a user can’t install the Relevance App from the HubSpot App Marketplace, they likely don’t have the App Marketplace access permission enabled on their account. A HubSpot Super Admin (or any admin with permission to manage users) needs to grant this.To grant access to multiple users at once, select the checkboxes next to each user in the Users & Teams list (they must share the same seat type), click Edit permissions at the top, toggle on App Marketplace access, and save.On HubSpot Enterprise, you can also add App Marketplace access to an existing Permission Set under Settings > Users & Teams > Permission Sets — all users assigned to that set will automatically receive the permission.
Navigate to Users & Teams
In the left sidebar, click Users & Teams. This shows a list of all users in your HubSpot account.
Select the user
Find the user who needs access and click Edit permissions. This opens the permissions editor.
Enable App Marketplace access
Scroll down to Account / Settings Access (or search for “App Marketplace”) and toggle App Marketplace access to ON. You may also want to enable App Marketplace uninstall access if the user should be able to remove apps later.
If the permission changes don’t take effect immediately, have the user open HubSpot in a private/incognito browser window. If it works there, they just need to clear their browser cache and cookies, then reload HubSpot.